Posted by elliemay on December 2, 2007
Last weekend, my sister and I went to my favorite neighborhood restaurant, Dinette, where the special of the day was chicken cannelloni. We don’t eat chicken so we didn’t order it, but everyone else in the place did. Every time we looked up, skillets of bubbling cannelloni were being brought out to the other tables. We contented ourselves with a meal of toast topped with herb frittata, ricotta gnocchi with delicata squash and leeks, and house pickled sardines with fennel and radishes – all of which was delicious – but, still, I couldn’t get the image of that cannelloni out of my head; I started craving cannelloni in the worst way. Finally, tonight, I decided that I just had to make it!
Cannelloni are pasta sheets that are rolled around a filling and then baked in a sauce, typically tomato sauce. The result is similar to lasagna except that the pasta is rolled rather than layered. Like lasagna, you can pretty much fill cannelloni with anything. I wanted to do something really special with my cannelloni so I decided to try making my own homemade ricotta and use that as the filling. It turns out that making ricotta at home is laughably simple. The toughest part is lugging a gallon of milk home from the store. I followed this recipe from 101 Cookbooks. You simply heat whole milk and buttermilk together in a pot until the curds separate from the whey. Then, you transfer everything to a colander lined with cheesecloth, hang the cheesecloth, and then let the ricotta drain until it stops dripping. That’s it! It couldn’t be easier, and this ricotta is infinitely better than the stuff you get in tubs at the supermarket.
I flavored my homemade ricotta with minced parsley, nutmeg, grated parmesan cheese, and salt and pepper. To make the cannelloni, I made a small batch of pasta dough and ran it through my pasta machine on the thinnest setting. I cut the pasta sheets into rectangles and then cooked them in boiling water until they were almost done. Then, I rolled the pasta around generous helpings of the ricotta, topped the whole thing with a very simple tomato sauce, and baked it, covered, in a 350 degree oven for about 30 minutes. To drink, I served a Dolcetto d’Alba from Poderi Elia. Dolcetto is an Italian wine that is similar to a full-bodied Pinot Noir.
The meal was great and certainly satisfied my cannelloni craving. And, with today’s heavy rain and wind, it was a perfect evening for hot, cheesy cannelloni. I can’t decide which wins for most comforting dish of the weekend: the French onion soup I had at Presse last night in the middle of that awesome blizzard or tonight’s cannelloni. The snowstorm is pretty hard to beat, but I think I need to give the edge to my cannelloni with homemade ricotta, if only because it was such a labor of love. Hooray for winter cuisine!
Posted by elliemay on November 20, 2007

I’ve had this notion in the back of my mind for some time now to try making vegetarian scotch eggs. What are scotch eggs you ask? Well, depending on who you are, the following description will either horrify or delight you. Scotch eggs are hard boiled eggs that are wrapped up in pork sausage and then breaded and deep fried. According to wikipedia, scotch eggs are of British origin and are typically eaten cold as a picnic snack.
My mom made scotch eggs for us as kids, and, for the longest time, I just assumed that everyone else had grown up with them as well. It turns out I was wrong. Anytime I have ever mentioned scotch eggs to friends or even strangers, nobody has ever known what I’m talking about. Well, last weekend, Robert and I were having dinner at Smith (where, incidentally, I put together a wonderful winter meal of beer-potted cheese with homemade crackers and balsamic roasted brussels sprouts) and, there it was on Smith’s menu: scotch eggs! I couldn’t believe my eyes. It was a sign; I knew it was time for me to attempt my vegetarian version of this British “delicacy.”
It turns out, I’m not the first to try this. Barrett, over at Too Many Chefs, has already worked up a recipe for vegetarian scotch eggs. Using his as a starting point, I developed my own recipe. First, I used Morningstar Farms crumbles in place of the Smart Ground just out of personal preference. Second, anticipating that a vegetarian scotch egg could end up being on the bland side, I decided to spice up my “meat mixture” a bit. I added minced onion and garlic as well as dried sage, dried thyme and cayenne pepper. I had a hard time getting the mixture both to stick together and to stick to the egg. It was too crumbly and lacked any of the natural stickiness that you get from real meat. To solve this, I pulsed the mixture a few times in my food processor to get rid of the larger crumbles and to make it into more of a uniform paste (and, yes, I do realize how gross vegetarian meat paste sounds.) I also dusted each egg lightly with flour to improve the stick factor. Finally, I let the formed scotch eggs chill for about 1 hour in the fridge (before coating with egg and bread crumbs,) thinking that this would also help prevent the eggs from falling apart.
I ended up baking the scotch eggs for longer than Barrett’s recipe calls for, mostly because I wanted to make sure the authentic sausage version I made for Robert was fully cooked (between this and the beef porcupines I made for Robert last week, it’s been like elliemay’s retro kitchen around here lately; bringing back my childhood favorites from the 1970′s!) The vegetarian scotch eggs turned out much better than I expected. They were full of flavor and not too dry (although they didn’t hold together too well once I cut into them.) The panko that I used for the outer coating crisped up nicely in the oven despite the fact that I hadn’t mixed it with any oil or butter. Unlike the Brits, we ate our scotch eggs warm, with home fries on the side.
In the comments section of Barrett’s recipe, one person notes that, as a child in school, they were given scotch eggs made with stuffing instead of sausage. That actually sounds like a really delicious idea. I’ve never been a huge fan of simulated meat, but I sure do love stuffing. Who knows? Maybe I can even bring them to Thanksgiving next year!
Click here for my Vegetarian Scotch Eggs recipe >>
Posted by elliemay on November 4, 2007
The two sugar pumpkins I received in last week’s CSA box had been beckoning to me all week long. “Cook me! Make me into something delicious!” But, what, I wondered? I had already considered the obvious choice, pumpkin pie, but I quickly ruled that out. Since it is just the two of us here, baking a whole pie wouldn’t make much sense. Besides, Robert has this little thing called will power (perhaps you’ve heard of it?) If I made a pumpkin pie, he would probably limit himself to one slice and leave the rest for me to either eat myself or guiltily throw away.
As I was puzzling over what to do with my pumpkins for a fifth day, Robert and my mom both independently suggested pumpkin muffins. I figured that was a sign and, as soon as they said it, pumpkin muffins started to sound really, really good. Last night, I halved and seeded my pumpkins and roasted them in a 350-degree oven until soft. I pureed the flesh and set it in the refrigerator so it would be ready for the morning. I used a basic buttermilk muffin recipe from Joy of Cooking and added to it 1 cup of pumpkin puree and a variety of sweet spices. They turned out very moist on the inside and super-crispy on the outside. I was a little aggressive in oiling my muffin tin because I hate it when they stick so think that is what caused them be so crispy. They were almost like pumpkin doughnuts (and there’s nothing wrong with that!)
I had no idea how much pumpkin puree I would get out of my pumpkins. They looked really small, and I was worried that I wouldn’t have enough for my muffins. Well, I ended up with about 3 cups which was way more than I needed. I decided to use up the rest by making pumpkin gnocchi. The recipe I used has a rather odd set of directions. It seems strange to me to cook the pumpkin puree with the flour over medium heat and then add the egg. Normally, I would mix the egg into the puree and then gently knead in the flour, all off heat. I was skeptical. I cooked a few of the gnocchi, and they were good so, weird directions aside, it all worked out in the end! I froze my gnocchi for an easy dinner later in the week. All they need is to be boiled and tossed in a brown butter-sage sauce.
After the gnocchi were done, I still had pumpkin puree to use up! I chose to make a pumpkin butter. A co-worker made some amazing apple butter the other day so I had butters on the brain I guess. I found a quick and easy recipe and just happened to have all of the ingredients on hand. I made just enough pumpkin butter remaining to fill a small jar. I can’t wait to try it on toasted crumpets or English muffins.
Finally, the seeds! My jack-o-lantern didn’t provide any seeds this year, and I was so disappointed because I love roasting the seeds like my mom always did when I was a kid. My sugar pumpkins relinquished a ton of seeds so I happily set to work cleaning and roasting them. I did something a little bit different this year. I followed this recipe which calls for simmering the seeds before roasting. I’m not sure if it was because of that extra step or simply because I was using the more delicate seeds from a sugar pumpkin this time instead of the hardier seeds from a carving pumpkin, but these seeds really puffed up and became light and crisp.
Yep, it was truly pumpkin mania in my kitchen today. What’s your favorite pumpkin recipe?
Posted by elliemay on October 17, 2007
Thanksgiving is one of my favorite holidays because it is such a food-centric holiday. I couldn’t wait to sample some of my favorite Thanksgiving dishes so I decided to do a little preview dinner.
A couple of hours before dinner, I made a quick cranberry sauce. Cranberry sauce is one of the easiest things in the world to make. It practically cooks itself so there is absolutely no excuse for eating canned cranberry sauce. I also don’t think there is any reason to go crazy with additions. Orange zest, wine, spices and dried fruit all sound great, but I prefer to keep my cranberry sauce as simple as possible. For one bag of cranberries, bring to a simmer 1 cup of water and 1 cup of sugar (I usually use a tiny bit less sugar because I like it on the tart side.) When the sugar has dissolved, add the cranberries. Simmer the cranberries for about 10 minutes and then remove from heat and chill thoroughly. That’s it! My favorite part of this process is watching the cranberries pop as they cook. That popping sound alone makes my mouth water for the winter holidays. If you have leftover cranberry sauce, do what my mom does and swirl it into plain Greek yogurt!
Another important component of any Thanksgiving dinner is winter squash. I had two beautiful Sweet Dumpling squash leftover from last week’s CSA box. Sweet Dumpling squash are cream-colored with green stripes and look sort of like Delicata squash, but they are short and round rather than elongated. They are very cute, and one makes a perfect single serving. I cut each squash in half, scooped out the seeds and roasted them in a 375 degree oven for about 45 minutes (cut side down first, then I flipped them over once during cooking.) Before serving, I drizzled them with a rosemary-brown butter sauce, but they didn’t need it. They were sweet and delicious on their own.
Finally, what Thanksgiving meal would be complete without stuffing? Some may proclaim that turkey is the most critical part of the meal but, for me, the real point to Thanksgiving is the stuffing. No Atkins diet around here! In my family, we always make our stuffing as a separate dish outside of the bird to ensure lots of crispy topping (and to avoid potentially contaminating the stuffing with undercooked bird juice.) I didn’t really have a recipe but, as it turns out, stuffing is one of those things that you don’t really need a super-strict recipe for. A mixture of bread, savory herbs and veggies and plenty of butter could never turn out horrible. That said, there are a couple of keys to making a good stuffing. It is important to taste the stuffing before baking to make sure it is seasoned properly. Seasoning is always a little tricky with something that gets baked because you can’t add more once it is assembled. Also, you want to get the liquid to bread ratio right so that your stuffing is neither too dry nor too wet. For 6 ounces of dry bread cubes (about 1/2 of a large loaf of French bread,) I used 1 cup of stock and 1 egg. Those amounts produced a stuffing with a nice balance of moist interior and crispy exterior. I forgot to make gravy, but it was not missed. I really wanted eat the whole pan myself but, unfortunately, Robert really loves stuffing as well so I had to share!
Posted by elliemay on September 12, 2007

OK, so clambake may be a stretch; clam “boil” or clam “steam” are more accurate descriptions of tonight’s meal, but, for the sake of recognition, I’m calling it a clambake. Clam “boil” doesn’t sound very appetizing, and it certainly doesn’t conjure up the same romantic images of late summer nights at the beach that the term clambake does. An authentic New England clambake is typically a laborious, all-day event. For a traditional clambake, you must dig a giant pit in the sand. Stones are placed in the pit and a big fire is built on top of the stones. Then, the fire is covered in wet seaweed (freshly harvested from the nearby ocean, of course) and whatever ingredients you wish to cook. Most commonly, this is clams, lobsters, potatoes, corn and some type of sausage such as chorizo or kielbasa.
For some reason, when my CSA box came loaded with corn and potatoes this week, I started craving clambake. But, while I may live on the West Coast, I don’t exactly live right on the beach, nor do I have my own backyard or even small plot of dirt into which I could dig a hole for a traditional clambake. I would have to develop a clambake recipe that would work on my stove top. After a short bit of research, I realized that there are actually lots of recipes for indoor clambakes out there. However, most of the recipes I came across called for way too many ingredients and involved way too many steps. I wanted something easy that could be cooked in one pot all at the same time. Using epicurious’ Easy Summer Clambake as a very, very loose guideline, I set to work improvising my own recipe. I decided to really streamline the ingredients. Leeks and garlic for the aromatics, potatoes and corn for the veggies, 1 small link of Spanish chorizo, lots of clams and, instead of lobster, I bought shrimp. Call me a wuss, but I just can’t do the live lobster thing. I think I could actually handle cooking the lobster once I got it home, but the thought of toting the poor thing around with me on the bus home from the market just makes me feel kind of icky.
The key to a successful clambake is layering the ingredients so that they are all done at the same time. Ingredients that take longer to cook go on the bottom; those with the shortest cooking time go on top. Into a large pot with a low-hanging steamer basket, I added my potatoes. Tiny, whole new potatoes are best. Next, I layered the chorizo and corn followed by the shrimp (which I left unpeeled) and finally the clams. For the broth, I added a mixture of white wine and water (enough to just reach the potatoes) and my aromatics. It is important to remember to salt the layers as you are adding the ingredients. In order to ensure that the potatoes would be done, I gave them a 5 minute head start before adding the other ingredients. 8 to 10 minutes later, my clams were open and my shrimp were nice and pink. Robert and I enjoyed the clambake with melted lemon-butter and bread on the side for dipping. To drink, we shared a delicious Spanish Albarino. It was a wonderful way to say goodbye to summer!
Posted by elliemay on September 3, 2007

We had a big, quasi-Mexican feast at my parents’ house yesterday. My mom made pulled pork with mole for the meat-eaters and also black beans and grilled polenta cakes (which falls under the “quasi” part of quasi-Mexican.) My sister made a spicy Southwestern green bean salad and brought over some fresh farmer’s market corn. My contribution to the meal included a Mexican Shrimp Cocktail, Cucumber Agua Fresca (still trying to use up those CSA cucumbers!) and Chocolate Beet Cake which we attempted tie into our Mexican theme by drizzling with a spicy raspberry-chili sauce but that, as you can see from the photo, ended up looking like a most patriotic, all-American dessert instead.
Now, you may be thinking, “Beets? In a cake? No way!” Yes, it sounds odd at first, but we use zucchini and carrots all the time in breads and cakes. So, why not beets? They are actually a perfect ingredient for a cake. Beets are naturally sweet, and, like zucchini and carrots, they produce a very moist cake. They are also an ideal match for chocolate as both are rich and dark and take well to sweet spices such as cinnamon and ginger. Plus, even though the cake cooks to a normal, chocolaty brown, the bright fuchsia color of the uncooked batter makes it fun to make (a good one for the kids to help out with.) And, the whopping 1.5 cups of pureed beets called for in the recipe makes this cake downright good for you!
Another bonus is that this cake is extremely easy to put together. The hardest part is keeping the kitchen clean while pureeing the beets (beware of those bubbles that form in the blender which can cause beet puree to explode everywhere. I ended up getting beet spatter on my face. It looked like something straight out of C.S.I.!) I made a couple of small changes to the recipe as written. I didn’t have any unsweetened chocolate on hand so I used a very dark chocolate instead and then reduced the sugar to 1 cup. This is probably more of a reduction than I needed to make to compensate for the sweeter chocolate, but I tend to like things on the less sweet side. I also substituted half of the oil with applesauce. I swear I’m not some sort of health nut, but the applesauce trick really does work, and it is an easy way to make your cakes a tiny bit less guilt-inducing. I skipped frosting the cake and, as mentioned, topped it with raspberry sauce and whipped cream instead which was perfect. Robert and I ate leftover cake with fresh berries for breakfast this morning, and it was delicious!
Posted by elliemay on August 23, 2007

For a while now, I have had a hankering to try making ice cream from scratch. Homemade ice cream always sounds so creamy and deluxe. The problem is that I am averse to spending money on an ice cream machine. I remember making ice cream once as a kid and the machine we used was heavy and awkward and a took up lots of storage space. Ice cream machines today are smaller and more efficient, but I still take issue with owning something that has such a specific and limited purpose (the “uni-taskers” as Alton Brown calls them.) So, when I stumbled across this post on David Lebovitz’s blog, in which he describes how to make ice cream without a machine, I bookmarked immediately.
The process that David outlines in his blog is pretty simple. You make your ice cream base according to the recipe of your choice (I used David’s basic vanilla.) After chilling the mixture well in the refrigerator, put it in a deep bowl and place it in the freezer. Every half hour, you want to scrape the frozen ice cream from the sides of the bowl and mix it back into the unfrozen portion using a heavy spoon, whisk or hand blender. It is important to mix thoroughly and vigorously. By breaking up the large ice crystals that are forming, you will create a light, uniform and creamy ice cream. After about 3 hours, your ice cream should be complete!
Yesterday ended up being the perfect day for making homemade ice cream – it was beautiful outside, my brother was coming over for dinner and I got out of work a little early so I had plenty of time to experiment in the kitchen. My ice cream turned out very creamy and soft, much closer to soft serve than store bought. Not surprisingly, it started to melt quicker than commercial ice cream. Pre-chilling the serving bowls would probably not be a bad idea. One of the great things about making ice cream from scratch is that you know exactly what is going in it, in my case lots of heavy cream, eggs and organic sugar. Hey, they may not be the healthiest of ingredients, but at least they are natural and I know where they come from. I flavored my ice cream with nothing more than a single fresh vanilla bean. The vanilla flavor was really strong but in a warm, spicy way not in a fake way like you sometimes get with vanilla extract. And, I just love seeing those little vanilla seeds everywhere (even if it did make my ice cream look a tiny bit gray!)
Posted by elliemay on August 10, 2007

I’m not a huge fan of cucumbers. It’s not that I don’t like them, I just don’t crave them like I crave other vegetables. It seems like anytime I buy a cucumber, I use about half of it for whatever recipe I am making and then inevitably let the remainder go to waste. Well, in this week’s CSA box, I received not one, but FOUR cucumbers! Two regular green ones and two Boothby’s Blondes. The Boothby’s Blondes are an heirloom variety from Livermore, Maine. They are oval in shape and look like bright yellow potatoes. They were beautiful cucumbers, but how was I, a veteran cucumber waster, going to use them all up?
It was time to hit up my trusty copy of How to Cook Everything by Mark Bittman for some ideas. I flipped to the cucumber section and was immediately struck by his recipe for Crispy Sautéed Cucumbers. I’ve never really thought of cucumbers as being a vegetable that you would want to cook. It kind of seems like a betrayal against everything a cucumber stands for – refreshing flavor, crisp texture, etc. But, it also sounded just odd enough that it could be good.
The recipe is quite simple. Cut a cucumber in half and remove the seeds. Then, slice the cucumber into ½ to ¾ inch chunks. Toss the chunks in a bag full of flour, shake off any excess flour and then fry the cucumbers in butter or oil, turning occasionally, until crispy on the outside and tender on the inside (about 10 minutes.) To finish, simply season with salt, pepper, lemon zest and parsley. Mark’s recipe also calls for tossing the fried cucumbers with sectioned pieces of lemon, but I skipped this step. Instead, I served them with homemade tzatziki sauce on the side, thereby using up even more of my cucumber surplus! I had kind of a dueling cucumbers theme going on.
The fried cucumbers were good, but not mind-blowing. They had a nice mellow cucumber flavor. Not surprisingly, due to their watery nature, they didn’t stay crisp for long. I was actually amazed that they were able to crisp up as much as they did. A combination of flour and cornmeal might have worked better than flour alone. I think the cornmeal would provide a nice crunch even after the cucumbers themselves were no longer crispy. I got the feeling while eating them that fried cucumbers must be a Southern dish. There was just something about them that felt very summery and Southern, akin to fried green tomatoes. While I may not have been transformed into a cucumber addict, this is certainly a quick and easy to way to use up leftover cucumbers.
Posted by elliemay on August 5, 2007

Robert and I hiked up Iron Peak this weekend, and I brought along a couple of Pain Bagnats for our lunch. Pain Bagnat (also commonly spelled Pan Bagnat) is a sandwich from the Provence region of France. It is basically Salade Nicoise on a crusty bun. The most traditional fillings are tuna or anchovies, hard-boiled egg, tomatoes, cucumber or bell pepper, olives and some sort of vinaigrette. Optional ingredients include sliced cheeses or meats, lettuce or other greens, pesto, capers, roasted bell peppers, sliced onion, or even marinated chickpeas. A nice crusty bun or loaf, such as a baguette, is essential to making a good Pain Bagnat.
Pain Bagnat is a perfect sandwich to take hiking because it doesn’t contain any highly perishable ingredients. Also, it is a very sturdy sandwich; once assembled, it is actually meant to sit for a while to allow all of the ingredients to marinate together and soak into the bread (Pain Bagnat actually translates to “bathed” or “wet” bread.) Pain Bagnats are usually pressed down using weights for anywhere from 15 minutes to overnight to assist with the marination process. I figured that wedging the sandwiches into a tightly packed daypack would have a similar effect. We ate our delicious Pain Bagnats with fresh grapes while enjoying the stunning 360-degree view from the top of Iron Peak.
Posted by elliemay on July 31, 2007
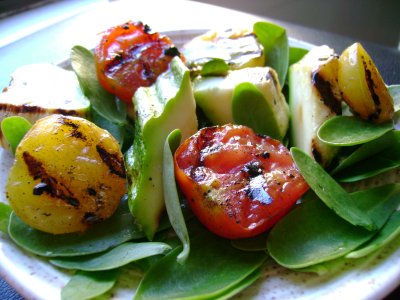
I picked up some purslane at the farmer’s market this weekend. Perhaps you are now saying to yourself, “what on earth is purslane?” Purslane is a succulent that is found most commonly in Mexican, Greek, and Middle Eastern cooking. It is a low-growing, creeping plant with small paddle-shaped green leaves and a thick reddish stem. It kind of looks like a jade plant but with much thinner leaves. Purslane is often used raw in salads, but it can be cooked as well. The leaves are tender and have a refreshing lemony flavor. The stems are edible too but are best when they are young and slender.
For all you gardeners out there, it is worth pointing out that purslane takes very little effort to grow. If you have a sunny spot in your garden, plant some purslane, and it will practically take care of itself. But, you might just want to check and see if you already have some growing first. Purslane is listed as one of the top ten most troublesome and pervasive weeds worldwide. People have been pulling it out of their gardens for years without ever knowing what a wonderful vegetable it can be. Purslane is slowly starting to shed its bad reputation, however. Word is getting out that purslane is rich in vitamins and antioxidants and also contains more of the potentially heart-protecting omega 3 fatty acids than any other leafy green vegetable.
My mom bought some purslane last week at her farmer’s market and used it to make Grilled Zucchini Salad with Purslane and Tomato so I decided to follow suit. I washed the purslane in several changes of water, and then I picked off the leaves and dried them in my salad spinner. Next, I grilled some zucchini and tomatoes on my little grill pan (which is producing better, more authentic-looking grill marks every time I use it!) The recipe doesn’t call for grilling the tomatoes, but I wanted to take some of the raw edge off. Once the grilled vegetables were cool, I tossed them together with the purslane in a lemon-shallot-parsley vinaigrette. The tart flavor of the purslane went really nicely with the smoky zucchini and sweet tomatoes. This was a really delicious change of pace from a standard lettuce salad. And, there is something mildly thrilling about eating a succulent!
Newer Posts » —
« Older Posts

